Vacuum Advance Stand Alone Degrees Stop Plate information
The purpose of these instructions is to rectify an issue with General Motors and other vacuum advances sold in the aftermarket. As GM distributors evolved from points to the large HEI, GM started to drop selling replacement parts for the points distributors, leaving parts stores to cover the slack. One serious factor became evident, aftermarket vacuum advances simply delivered too many degrees of timing. Why? Well, one very small part was not carried over from the GM to aftermarket advances, simple in fact, a short piece of rubber tubing that GM added to every advance, overlooked in aftermarket. This short rubber tube was placed over the part of the pull pin that slides inside the slot at the end of the advance, to stop down the total number of degrees the advance gives.
So, we end up with the correct vacuum advance, but it gives far too many degrees of timing, because there is no simple rubber tubing over the pull pin. Adding the rubber tube would give the correct degrees. But, what usually happened on the GM rubber was that after a service life, that rubber tubing literally rotted off the pin, giving us too many degrees. And, aftermarket advances do not come with the tube, and most people are not aware it needs to be in place.
These instructions will go a bit farther than simply adding a section of rubber tubing to an advance. They are intended to show how to make a home made metal stop for the advance, or, fit an adjustable scroll plate to the advances, to give a positive stop that will not ever rot off, and one gives adjustability to the degrees.
How many posts on websites have we all seen that states “I plugged the vacuum advance into full manifold vacuum, and it gave me 30 degrees of timing”? These instructions should help rectify that.
These instructions work with both GM points type, and the later large diameter HEI ignition vacuum advances. Please be aware, large diameter HEI vacuum advances operated a bit differently, they were used on ported vacuum and did not come with a positive pin stop, however, if you are modifying one, having adjustment to the vacuum advance degrees is a good thing, as most swap the ported vacuum to full manifold vacuum sourcing, and the stop helps not over advance the timing. Please remember, large cap HEI were designed for emissions use, not performance, and ported vacuum advance worked with an emissions engine that uses an EGR (Exhaust Gas Recirculation) valve only.
These steps will set the vacuum advance degrees up correctly to use full manifold vacuum, instead of the incorrect ported vacuum sourcing. There is NO reason to use ported vacuum on any engine NOT equipped with a functioning EGR valve, NONE. Also, ported vacuum advance is one of the largest causes for pinging and detonation, adverse overheating, and performance issues not easily solved.
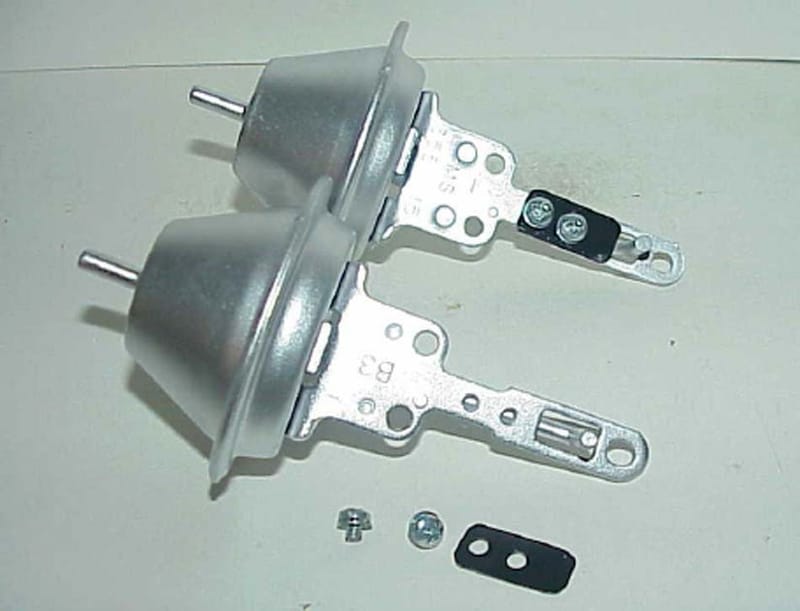
The Crane 99619-1 stand alone degrees stop’ will fit a large number of GM stock vacuum advances for both point type, and large diameter, coil in cap HEI's. The point distributors will benefit from the cutting of the body so a wrench can be used to loosen/tighten the stop plate hold down screw for adjustment. Large HEi has enough room to access the screw without cutting the distributor body.
Why use full manifold vacuum, and not ported? Full manifold vacuum works when the engine load is either very low, or becoming static at cruise speeds, when the engine can tolerate the added ignition timing degrees. PORTED vacuum sourcing adds an adverse second acceleration advance curve, which is directly responsible for pinging, and requiring slowing down the actual acceleration mechanical curve (as is done on GM ZZ series engines), overheating issues, lowered engine efficiency, decreased fuel economy, and performance that is lower than what the engine can produce when it has a correctly fed, full manifold vacuum fed vacuum advance system and correct initial and mechanical curves.
The set distance stop cam be made from thin steel or aluminum plate, and held in place with two 6/32 or metric equivalent sized screws.
Distances for the set pull pin travel stops, and their various delivered degrees:
.086 inch: 8 crankshaft degrees
.110/.112 inch, 10 crankshaft degrees
.130 inch, 12 crankshaft degrees
There is NO need to use any more vacuum advance added degrees than 12. Engines want between 20 and 24 degrees IDLE timing, and that would be the INITIAL plus full manifold vacuum degrees added. Example, 14 degrees INITIAL, 8 added VACUUM, 22 IDLE degrees, derived AFTER the engine starts and vacuum builds.
EXTREMELY IMPORTANT: DO NOT USE A DIAL BACK TIMING LIGHT FEATURE TO SET ANY TIMING THAT IS NOT FULLY COMPUTERIZED. DIAL BACK TIMING LIGHTS ARE FOR COMPUTER CONTROLLED IGNITION SYSTEMS, SPECIFICALLY, DISTRIBUTOR-LESS ONES, AND NOT FOR CONVENTIONAL SYSTEMS THAT USE MECHANICAL/VACUUM ADVANCE CURVES. DIAL BACK FEATURES HAVE A "COMPUTER LAG" DESIGNED INTO THEM, TO COMPENSATE FOR THE COMPUTATION LAG TIME IN MILLISECONDS THE EFI COMPUTER COMPUTES AND SETS THE TIMING, AND IT ISN'T FOR CONVENTIONAL SYSTEMS.
Conventional non-EFI computer timed, analog ignition systems do not have a “lag time, nor use computations, they do not require a “lag time” dial back to read timing correctly.
THE CORRECT WAY TO CHECK AND SET TIMING ON A NON-COMPUTER IGNITION SYSTEM IS TO LEAVE THE DIAL BACK FEATURE ON ANY AND ALL TIMING LIGHTS OFF, AND ADD DEGREE MARKS TO THE BALANCER. Also, never leave the vacuum advance connected while setting INITIAL timing, nor while checking total timing, which is the combination of INITIAL and MECHANICAL CURVE degrees. Example, INITIAL of 12 degrees, MECHANICAL curve of 22 degrees equals 34 crankshaft degrees.
A VERY SERIOUS NOTE ON “DYNO TUNING”. If some dyno hero tells you they can set the timing and fuel curves (jetting) up on a dyno, SAY “THANKS, BUT…NO”, THEN RUN AWAY AS FAST AS YOU CAN. WHY? Well, dyno’s LOVE excessive timing and jetting, don’t do well with the correct settings engines like to run on, in places like streets and roads. If you do have someone dyno TUNE your car, make sure to set the settings back to the way they were for street use, once you find a way to get that lump that has NO power, off the dyno.
Dyno’s are GREAT development tools, but really bad fine tuning devices.
PLEASE NOTE: There are two pictures of the MSD type vacuum advance degrees stop plate in this presentation. I DO NOT recommend using this type stop. The Crane/FAST stop is a lot easier to work with, takes up less space and is just plain better, and more finite in its adjustment.